Run Manager
Overview
The Run Manager is used to compose and submit model runs (YouTube video)
- Each model run is based on a Case definition comprising:
Scenarios
Regions
Settings
Properties
Sections
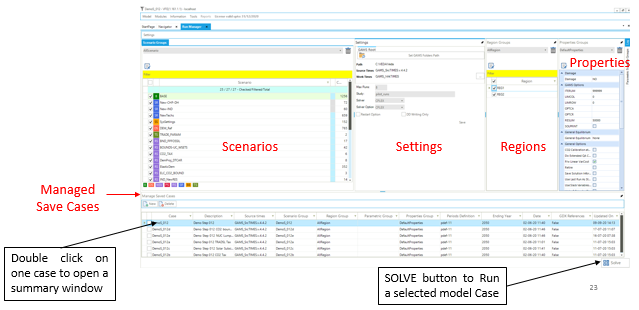
Scenario Group
Check BASE/SysSettings and the list of scenario to be included in a “cluster” that is then given a name for inclusion later in a Case Definition for a model run.
Settings
To designate where the GAMS and TIMES files reside, in what folder the model is to be run, the Maximum number of runs that are to be submitted in parallel, the Solver to be used and the Solver Options file to be employed.
Region Group
Designation of the regions to be included in the Group definition.
Properties
Which GAMS switches are to be employed for the run.
Cases
List of Cases prepared identifying the Run name/Description, Scenario Group, list of regions, the Property specification to be used, period definition and ending year, and date information.
DD and script files
- There are three different possible structures of the GAMS_Wrk.. folder and sub-folders based on the following inputs:
Max Runs =1
Max Runs >1
Parametric scenario case (irrespective of Max Runs)

Modifying RUN files
There are new attributes to write TIMES switches or GAMS code at five different locations in the RUN file. Further, these declarations can also be made at the top or bottom of scenario DD files (last two attributes in the table below). The attributes are supported by regular INS/DINS tables, in any scenario file or in SysSettings.
Attribute |
Location |
Alias |
|---|---|---|
RFCmd_GAMS |
<GAMSOPTIONS> |
RFCmd_G, RFCmd |
RFCmd_OPTIMIZER |
<OPTIMIZER> |
RFCmd_O |
RFCmd_FLAGS |
<SET FLAGS> |
RFCmd_F |
RFCmd_DD |
<INCLUDE DD FILES> |
RFCmd_D |
RFCmd_GLOBAL |
<GLOBAL Parameters> |
RFCmd_Glb |
SFCmd_top |
top of the scen DD file |
SFCmd_T, SFCmd |
SFCmd_bot |
bottom of the scen DD file |
SFCmd_B |
There is no need to modify the RUN file template manually.
Commands will be ordered by Value column; only rows with value>0 will be considered. If multiple scenarios send commands to the RUN file, the blocks will be ordered as per the order of scenarios in the case definition.
Tip
This also opens up some new possibilities. For example, you can run parametric scenarios where base prices for elastic demands are picked up from different Reference cases.
These examples are available in the Advanced Demo model.
~TFM_INS |
||||
|---|---|---|---|---|
Attribute |
Other_Indexes |
Value |
Comment |
|
RFCmd_F |
$SET BENCOST YES |
1 |
Written to FLAG section of RUN file |
|
RFCmd_F |
$SET ANNCOST LEV |
2 |
||
RFCmd_F |
$SET WAVER YES |
3 |
||
RFCmd_G |
GAMS statement 1 |
1 |
Written GAMSOPT section |
|
RFCmd_Glb |
GAMS statement 2 |
2 |
Written to Global parameters section |
|
RFCmd_Glb |
GAMS statement 3 |
3 |
||
SFCmd_T |
$OFFEPS |
1 |
Top of the scen DD file |
|
SFCmd_B |
GAMS statement A |
3 |
Bottom of the scen DD file |
|
SFCmd_B |
GAMS statement B |
4 |
If you want to use single quotes <’> or commas <,> in your instructions, then it is necessary to use a DINS table, as shown below. DINS tables need process or commodity specification. You can use any valid process instead of IMPNRGZ; it will have no impact on the outcome.
~TFM_DINS-AT |
||
|---|---|---|
RFCmd_DD |
Other_Indexes |
pset_pn |
3 |
set nr(all_reg); |
IMPNRGZ |
4 |
nr(all_reg)=yes$(not r(all_reg)); |
IMPNRGZ |
5 |
*– |
IMPNRGZ |
6 |
*Python embedded code to remove invalid TU and TB trade processes |
IMPNRGZ |
7 |
set cb_p(r,p) all crossborder processes involved |
IMPNRGZ |
8 |
*– |
IMPNRGZ |
9 |
; |
IMPNRGZ |
10 |
cb_p(r,p)=yes$gr_genmap(r,p,’CrossBorderTrade’); |
IMPNRGZ |
11 |
*– |
IMPNRGZ |
12 |
embeddedCode Python: |
IMPNRGZ |
13 |
ncb_p = [] |
IMPNRGZ |
14 |
for r,p in gams.get(‘cb_p’): |
IMPNRGZ |
15 |
*– |
IMPNRGZ |
16 |
*– |
IMPNRGZ |
17 |
*– |
IMPNRGZ |
18 |
gams.set(‘ncb_p’,ncb_p) |
IMPNRGZ |
19 |
endEmbeddedCode ncb_p |
IMPNRGZ |
20 |
ACT_BND(R,T,P,S,’UP’)$ncb_p(r,p) = EPS; |
IMPNRGZ |
Case definition
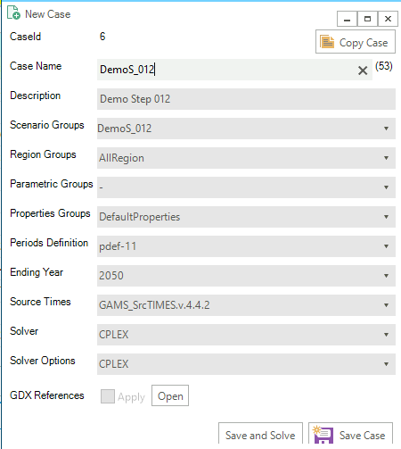
- Create a New Case by providing the core information for the case definition (or copy an existing Case to create a starting point)
Case Name - name of the case
Description - description of the case
Scenario Group - scenarios to be included in this run
Region Group - regions to be included in this run
Properties Group - what GAMS options/switch are to be employed
Periods Definition - period definition for the run
Last Period - last period for the run
Source TIMES - where does the TIMES code reside
Solver - which solver is to be used
Solver Options - which solver options to use
- Optional
Parametric Group - Parametric scenario file to create suites of runs
GDX References - GDX files to be used for freezing periods, elastic demand base prices or IRE bounds/prices
GDX References
Options “Save solution information” and “Write B Price for Elastic Demands” create casename_P and casename_DP GDX files, which are automatically copied to the appdata folder so that they are available for being included in subsequent runs. The recommended way is to create a property group, “save sol info”, for example, with these options selected (in addition to the other options you are using), and use this group for Ref runs. The casename.GDX file can also be used to freeze the solution up to a certain period, and you can manually copy this file from the GAMSWrk folder to the appdata folder, if you want to use a case where the save information options were not selected.
Model run submission

Select one (or more) of the cases in the Managed Save Cases section and click SOLVE
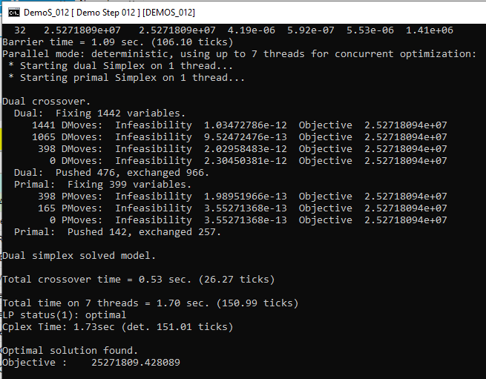
Solving a model opens a CMD window showing the GAMS solution log
Managing output files
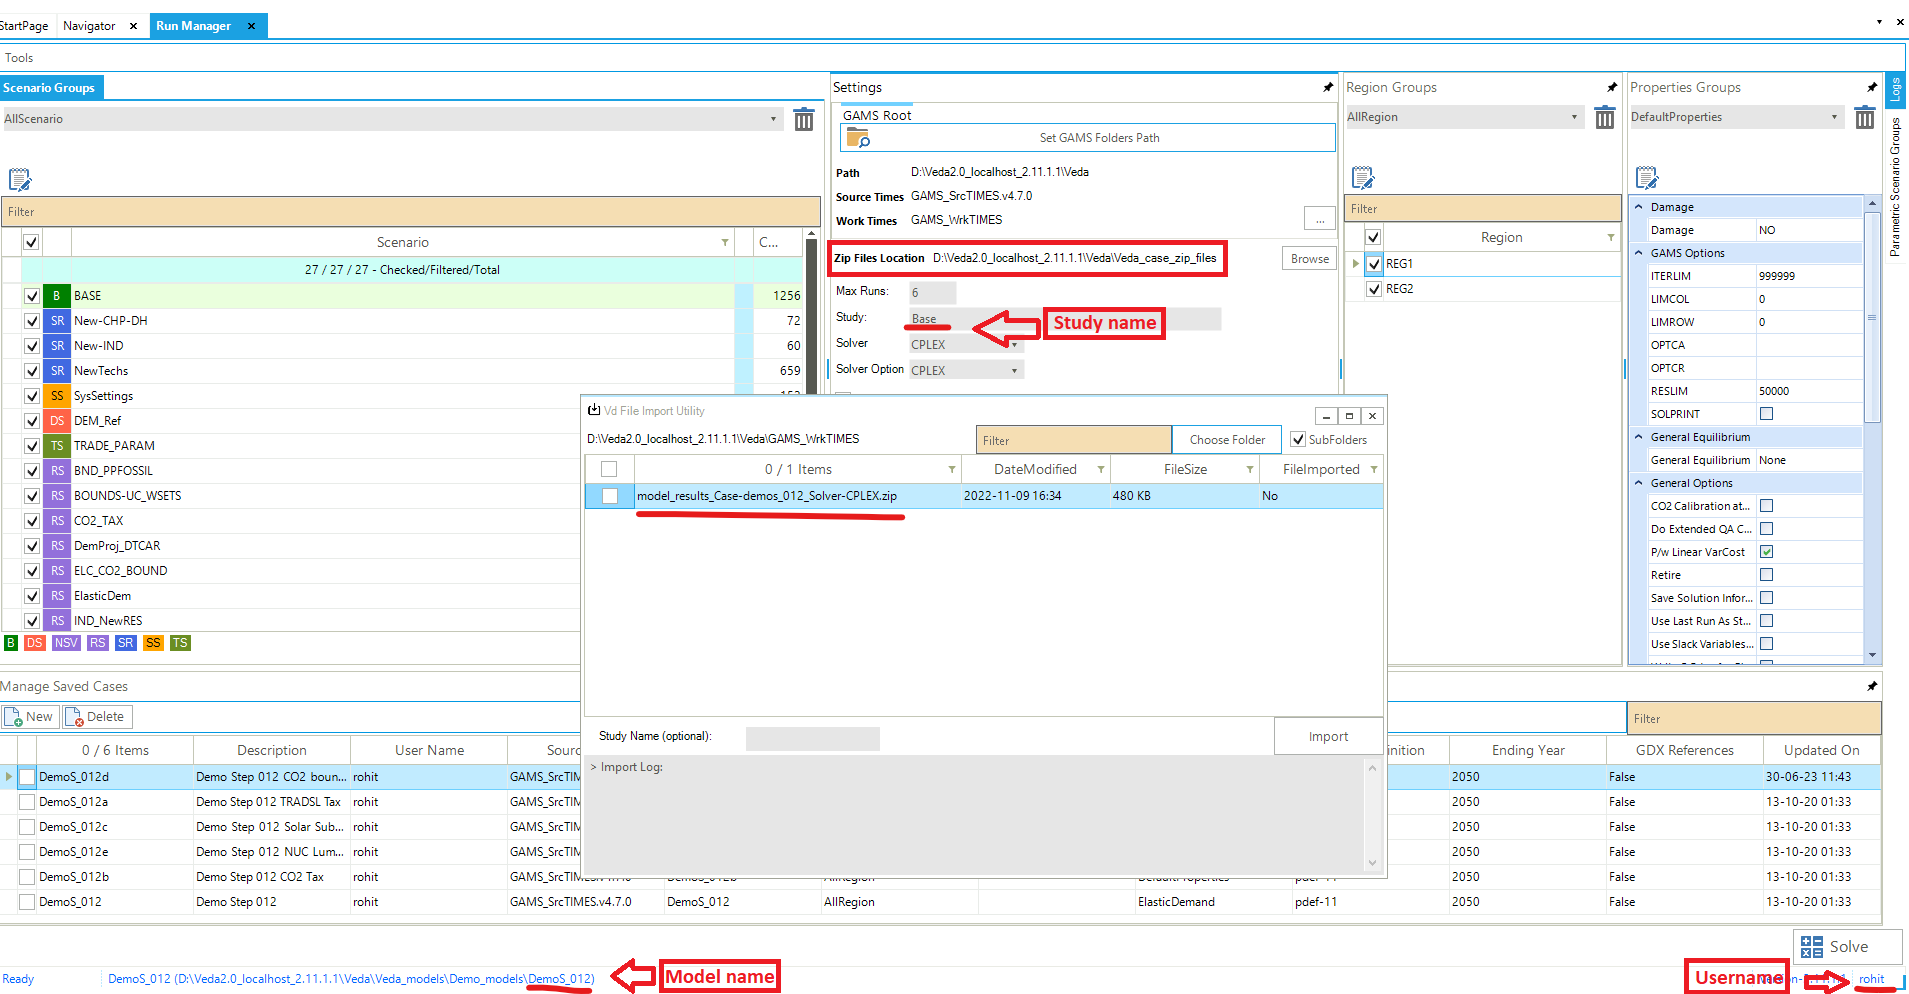
Output files of large models can be as large as 1 GB per case. All the information is contained in <casename>.GDX file, and txt files are created for transferring data to Veda databases, which are almost 3 times the size of the GDX files. Starting in version 2.4.1.1, Veda offers efficient management of these files. Veda can create a zip archive with key files like <casename>.GDX, <casename>~data_<datetime>.GDX, LST, QA_Check, and the TIME2Veda.VDD file from the active GAMS_Src folder. These archives can be stored in a central location (across users and models) that is under user control. Import VD file feature now creates temporary copies of VD files when these archives are selected for import.
Import runs from Veda online
- To import the zip files in Veda2.0, follow these steps:
Create a folder named “Veda_case_zip_files” within the Zip Files Location folder. However, if the folder already exists, you can skip this step) (see attached image).
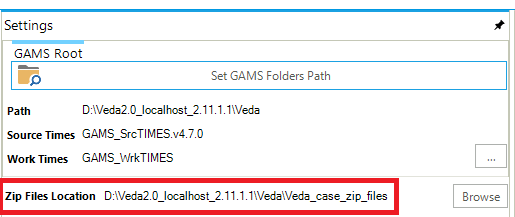
Inside the “Veda_case_zip_files” folder, create subfolders for your username, model name, and study name {username\model name\study name}. Place your zip files into study name subfolder.
The final path will depend on your username, model name, and study name. For instance, if your username is “rohit”, model name is “DemoS_012”, and study name is “Base” the path will be: Veda_case_zip_files\rohit\DemoS_012\Base\model_results_Case-demos_012_Solver-CPLEX.zip. (See attached image)